Abstract Grunge Procreate Sticker Stamp: A Workflow for Custom Planner Assets
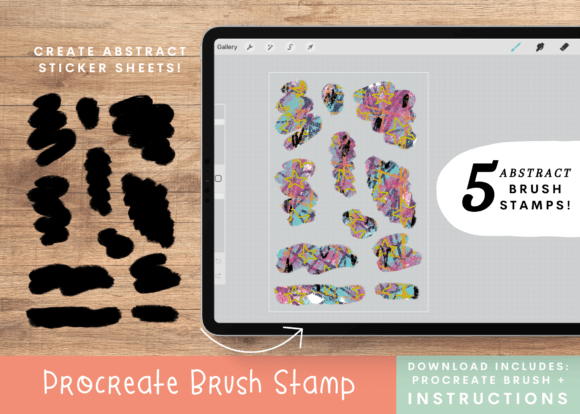
The digital planning ecosystem has evolved significantly, moving from simple text-based organization to highly visual, aesthetic-driven systems. For creators, entrepreneurs, and productivity enthusiasts, the ability to customize these systems is no longer a luxury but a necessity for maintaining engagement and personal connection with daily tasks. The Abstract Grunge Procreate Sticker Stamp set represents a specific tool designed to bridge the gap between digital creativity and physical utility. This collection of five stamp brushes allows users to generate trendy abstract planner stickers directly within the Procreate app, leveraging the power of clipping masks to produce high-quality, printable assets.
Understanding how this resource fits into a broader creative workflow is essential for maximizing its value. It is not merely a set of brushes; it is a production asset that streamlines the creation of decorative elements for bullet journals, vision boards, and organizational planners. Whether you are a small business owner looking to sell printable sticker packs or a hobbyist aiming to personalize your own agenda, the process involves specific technical steps that ensure professional results.
Integrating Digital Brushes into Physical Planning Systems
The primary function of the Abstract Grunge Procreate Sticker Stamp is to serve as a masking tool. In traditional design, creating irregular, organic shapes often requires complex vector drawing or manual cutting. These brushes automate the shape generation while retaining the textured, imperfect aesthetic associated with grunge art styles. This style is particularly effective in modern planning because it adds a layer of human touch and artistic flair that rigid geometric shapes often lack.
This tool interacts seamlessly with other resources in a creator's toolkit. It is designed specifically to work alongside pattern layers, meaning the visual complexity comes from the texture you choose to fill the stamp, not just the brush stroke itself. This modularity allows for infinite variation. You can use the same set of five stamps to create hundreds of unique stickers by simply changing the background pattern layer. This efficiency is crucial for professionals who need to produce content quickly without sacrificing quality.
For those involved in the "maker" economy, the commercial use license included with this set is a significant factor. It removes legal barriers for entrepreneurs wishing to incorporate these designs into products sold on platforms like Etsy or Shopify. The workflow supports both individual customization and batch production, making it versatile for various scales of operation.
Preparing the Canvas and Pattern Layers
Successful implementation begins with proper preparation of the digital canvas. Before selecting any brush, the foundation must be laid. The first step in the process involves importing or creating a pattern that will eventually fill the stickers. This could be a photo, a hand-drawn texture, a digital paper design, or a gradient. The critical requirement is that this pattern must fill the entire canvas area.
If the pattern does not cover the full workspace, the resulting sticker may have unwanted transparent edges or cut-off sections. Once the pattern layer is established, it serves as the visual content. Create a new layer immediately above this pattern layer. This separation is vital for the non-destructive editing capabilities of Procreate. By keeping the pattern and the stamp shape on different layers, you retain the flexibility to adjust one without affecting the other.
Choosing the right pattern is also a strategic decision. High-contrast patterns tend to pop better when cut out, while subtle textures offer a more refined look. Consider the final application of the sticker. If it is intended for a dark-colored planner page, a light pattern is necessary. If it is for a white journal, darker or colorful patterns provide better visibility. This stage of preparation ensures that the final output aligns with the intended aesthetic goals of the project.
Executing the Stamp and Clipping Mask Technique
With the layers prepared, the core of the workflow begins. Select a stamp from the Abstract Grunge Procreate Sticker Stamp set. The placement of the stamp is important for composition. Aim to place the stamp as close to the middle of the canvas as possible. This central positioning ensures that the maximum amount of the pattern is captured within the stamp's boundaries.
Size is another critical variable. The optimal size for these specific brushes is approximately 68%. Using a size that is too large may result in the edges of the stamp touching the canvas borders, which can complicate the cutting process later. Conversely, a size that is too small may waste canvas space if you are producing multiple stickers in a single file. Adjusting the size to this sweet spot provides a balanced composition that looks intentional and professional.
Once the stamp is applied as a new layer, the next step involves refining its fit. Select the arrow option located in the upper left corner of the interface. When the transformation menu appears at the bottom, select the "Fit to Canvas" option. This action scales the stamp layer to match the dimensions of the canvas exactly. However, precision is key here. After fitting to the canvas, it is best to size the stamp down just a tiny bit. This slight reduction accounts for the offset often created in cutting software like Cricut Design Space or Silhouette Studio. This foresight prevents the cutting blade from accidentally slicing into the edge of the pattern, ensuring a clean separation between the sticker and the background paper.
Applying the Clipping Mask for Precision
The magic of this workflow happens in the layers window. Open the layers panel in the upper right corner of the screen. You will now see two distinct layers: the pattern layer and the stamp layer. To make the pattern visible only within the shape of the stamp, you must rearrange these layers. Tap and hold the stamp layer and drag it underneath the pattern layer in the list.
Once the stamp layer is positioned below the pattern layer, tap the pattern layer to select it. With the pattern layer active, long-press on it until the context menu appears, then select "Add Clipping Mask." Alternatively, you can tap the three dots on the pattern layer and choose the same option. This action tells Procreate to clip the pattern layer so that it is only visible where the pixels of the layer below (the stamp) exist.
The result is an instant, perfectly masked sticker design. The rough, grunge edges of the stamp define the boundary of the pattern. This technique eliminates the need for manual selection tools or erasing, which can often result in jagged or pixelated edges. The clipping mask method preserves the integrity of the original brush stroke, giving the final product a cohesive, high-quality appearance.
From Digital File to Physical Product
After creating the sticker design, the transition to the physical world is straightforward. The digital file can be exported as a PNG with a transparent background. This format is universally accepted by cutting machines. For those using a Cricut or Silhouette, import the image into their respective software (Design Space or Studio). Because the sizing was adjusted slightly earlier to account for offsets, the machine should trace the outer edge of the grunge shape accurately.
Printing the stickers requires attention to material choice. Standard cardstock works well for general use, but specialty sticker paper offers better durability and water resistance. If you are producing these for commercial sale, consistency in print quality is paramount. Ensure your printer settings are optimized for the specific paper type being used to avoid color shifts or smudging.
Cutting can be done by hand for a truly artisanal feel, or via machine for speed and precision. Hand-cutting allows for a unique, imperfect edge that complements the grunge aesthetic, while machine cutting ensures uniformity for larger batches. Both methods are viable depending on the volume of production and the desired finish.
Optimizing Efficiency and Long-Term Use
To get the most out of the Abstract Grunge Procreate Sticker Stamp, consider building a library of reusable assets. Save the pattern layers you find most effective as templates. Over time, you will develop a personal collection of textures that work best with these specific stamps. This approach reduces the time spent searching for new backgrounds and accelerates the production cycle.
Organization within the Procreate file is also beneficial. If you are creating a sheet of multiple stickers, use groups to keep each sticker's layers organized. This makes it easier to duplicate, move, or modify individual stickers without disrupting the rest of the layout. For commercial users, maintaining a consistent file structure helps in managing inventory and fulfilling orders efficiently.
Furthermore, understanding the limitations and strengths of the tool helps in setting realistic expectations. While these brushes excel at creating organic, abstract shapes, they are not designed for precise geometric forms or text. They are specialized tools for a specific aesthetic outcome. By integrating them into a workflow that acknowledges their specific purpose, users can achieve professional-grade results that enhance their planning systems or product offerings.
Ultimately, the Abstract Grunge Procreate Sticker Stamp is more than a digital download; it is a catalyst for creativity. It empowers users to take control of their visual identity, whether for personal organization or business growth. By mastering the clipping mask technique and understanding the nuances of sizing and export, anyone can transform simple digital strokes into tangible, functional art.